segunda-feira, maio 27, 2013
segunda-feira, janeiro 07, 2013
SATURDAY, APRIL 16, 2011
Making a Faced Binding

So, when I make large art quilts, I like to make faced bindings, which creates a very clean finish to the front of a quilt (and you can never get a critical comment from a judge that your binding is not evenly filled either, lol).
The first thing you need to do is cut a four inch wide strip of fabric for each side of the quilt that is about 4" longer than each side.
Fold the fabric in half lengthwise and press.
After I have trimmed the quilt to size, I machine stitch the edge to secure any quilting lines that have been cut and to keep the 3 layers secured while sewing the binding on.

Pin the binding fabric to the front of the quilt with a couple extra inches of binding at either end.
With a pencil place a mark 1/4" from the top edge of the quilt, do the same at the bottom edge of the quilt. This is where you will begin and end stitching. Stitch binding down with 1/4" seam allowance.


Finger press the second binding at a 45° angle.

This finger pressed line will be your stitching line.
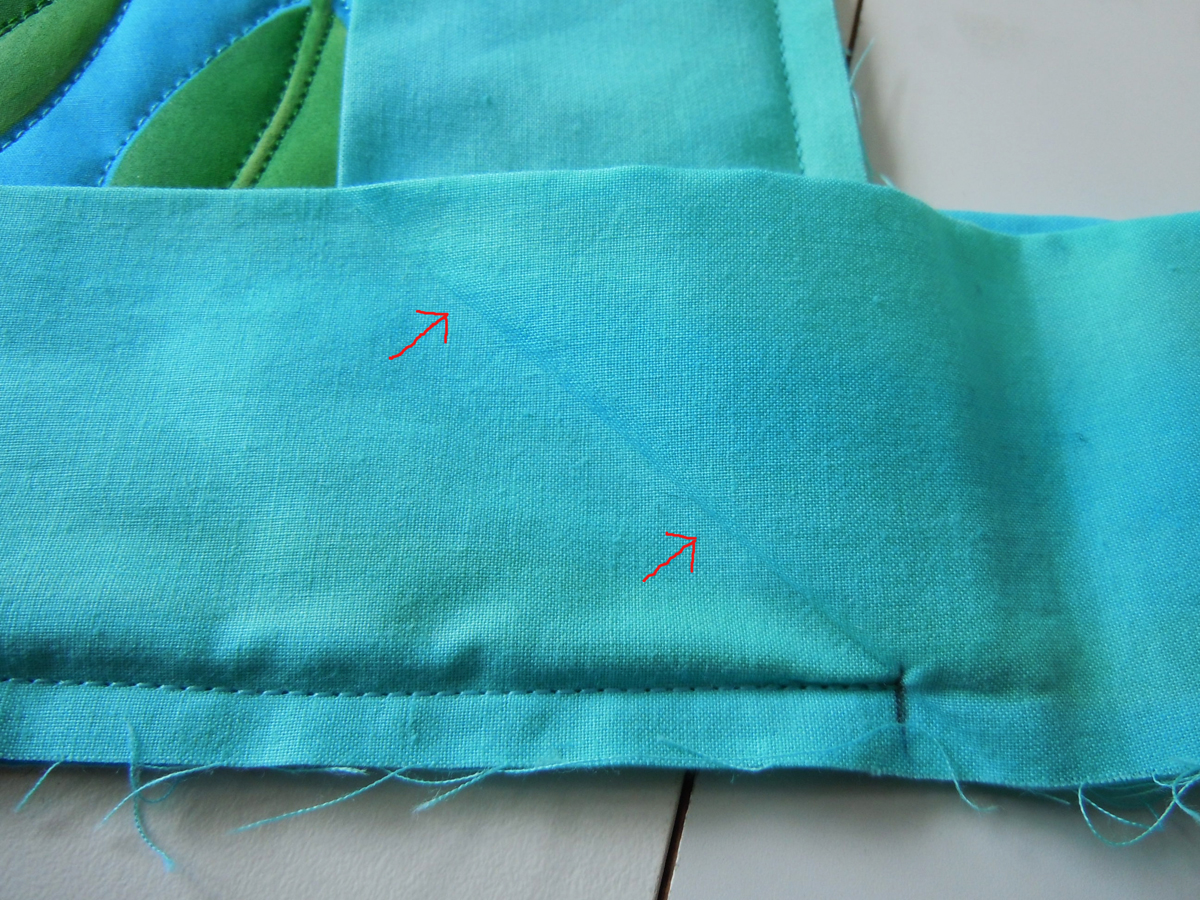
Bring the two binding edges together, matching up the finger pressed lines and pin.

Pull the quilt out of the way and stitch along the finger pressed line.

Stop stitching at the pencil mark.


Trim seam to 1/4" and finger press open.

Trim bulk of seam allowance away at corner being careful not to cut the stitching line.


Trim the seam allowance at an angle toward the corner.

Turn the binding to the back, poking the corner out to a point with your finger or with a blunt pointed object. Press the binding along the edge of the quilt with a hot iron. Then slip stitch the binding to the back of the quilt.

A nice clean finish!

Etno Botânica: PELES – COURO – MODA - A MATANÇA DE ANIMAIS E O C...
Etno Botânica: PELES – COURO – MODA - A MATANÇA DE ANIMAIS E O C...: O que é "invisível" aos olhos nestes belos Casacos de Peles, bolsas e calçados em couro. A medida em que adiamos olhar para e...
Etno Botânica: Índigo Natural – O Azul de Origem Vegetal
Etno Botânica: Índigo Natural – O Azul de Origem Vegetal: Matéria-prima: O extrato natural de Índigo pode ser obtido a partir da fermentação das folhas de várias espécies de anileiras como por ex...
quarta-feira, agosto 29, 2012

terça-feira, julho 10, 2012


Desculpe que fiquei tanto tempo sem vir aqui...é o corre corre da vida e a onda facebook , as vezes posto fotos lá é "Almofadas Bhumi" ou "Bhumi Artesanato Contemporâneo". Seguem fotos produção da semana, o inverno chegou por aqui e essas almofadas são com lindos tecidos importados e nacionais, com um toque macio que combina com inverno tecidos 100% algodão. 50x50, 35x55 e 0,60 diâmetro. Dá um curtir lá no face se você gostou. Obrigada!
quinta-feira, março 15, 2012


segunda-feira, janeiro 09, 2012
Bonecas


segunda-feira, dezembro 26, 2011


Assinar:
Postagens (Atom)